Deepomatic Platform
  • Overview
  • Release notes
    • January 2025
    • November 21, 2024
    • October 17, 2024
    • September 19, 2024
    • July 18, 2024
    • June 27, 2024
    • May 23, 2024
    • April 18, 2024
    • March 21, 2024
    • February 22, 2024
    • January 18, 2024
    • December 13, 2023
    • October 26, 2023
    • July 20, 2023
    • June 29, 2023
    • May 29, 2023
    • April 27, 2023
    • March 30, 2023
    • February 17, 2023
    • January 19, 2023
    • December 22, 2022
    • November 18, 2022
    • October 19, 2022
    • September 19, 2022
    • July 27, 2022
    • June 26, 2022
    • May 17, 2022
    • April 13, 2022
    • March 17, 2022
    • February 10, 2022
    • December 21, 2021
    • October 26, 2021
  • Getting started
  • ADMIN & USER MANAGEMENT
    • Invite and manage users
      • Invite group of users at once
      • SSO
        • Azure Active Directory
  • Deepomatic Engage
    • Integrate applications
      • Deepomatic vocabulary
      • Deepomatic connectors
        • Set-up
        • Camera Connector
        • Work Order Connector
      • API integration
        • Authentication
        • Errors
        • API reference
          • Work order management
          • Analysis
            • Guide field workers
            • Perform an analysis
            • Correct an analysis
          • Data retrieval
          • Endpoints' list
      • Batch processing
        • Format
        • Naming conventions
        • Processing
        • Batch status & errors
      • Data export
    • Use the mobile application
      • Configure a mobile application
      • Create & visualize work orders
      • Complete work orders
      • Offline experience
    • Manage your business operations with customisable solutions
      • Roles
      • Alerting
      • Field services
        • Reviewing work orders
        • Exploring work orders
        • Grouping work orders
        • Monitoring assets performance
      • Insights
  • Security
    • Security
    • Data Protection
Powered by GitBook
On this page
  • Fixed sized resizer
  • Keep Aspect Ratio resizer

Was this helpful?

  1. Deepomatic Drive
  2. Configuring Visual Automation Applications
  3. Training models and model versions

Image resizer options

Was this helpful?

Resizing is necessary to make sure every image in the network has the same shape. You can modify the resizer among the preprocessing steps.

It is generally recommanded to keep the default resizing values. However there are cases where you would want your model trained on different sizes, for example:

  • To adapt to your use-case images if they are smaller/lower quality than your training data

  • Mitigating regions with unusual aspect ratios (see )

When experimenting with resizing, in order to see meaningful results, you need to multiply or divide the scales significantly (e.g x2 or x4).

Fixed sized resizer

Here you can set manually the height and width of your images. We enforce an increment of 16 pixels to comply with some architectures convolution constraints (YOLO). Height and width don't need to be equal.

This is the recommended option when your image sizes are not extreme (approximately square or 16:9). You generally don't have to worry about slightly distorting your images, even if they lose their "natural" aspect, the network will learn the distorted way, and the performances will be the same. Variance in aspects can even bring some "augmentation" to your data.

Keep Aspect Ratio resizer

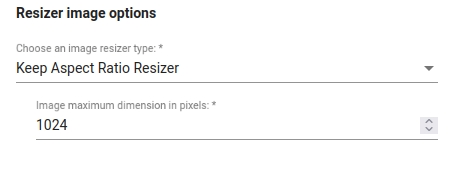
This resizer will resize all images to the same size, but it's keeping the original aspect ratio by padding with black pixels. Note that here we are talking about minimum/maximum dimensions, not height/width. The same scaling ratio is applied to both dimensions, such as to match the maximum dimension parameter.

Note that the minimum dimension in pixels parameter is not available in Studio, and it is 1024 by default. You should not set a maximum dimension value lower than 1024, otherwise the preprocessing will crash.

The output size can be described by two cases:

  1. If the image can be rescaled so its minimum dimension is equal to the provided value without the other dimension exceeding max_dimension, then do so.

  2. Otherwise, resize so the largest dimension is equal to max_dimension.

Examples

  • Example 1: 600x600 image. min_dimension is 600. By scaling it to 1024, the max_dimension will also be 1024.

  • Example 2: 600x900 image. min_dimension is 600. By applying the ratio 900*(1024/600), we get a max_dimension value of 1536.

    • If you set a max_dimension value lower than that (e.g 1024), we fall into the case [2]. So the image is resized to max_dimension=1024, and min_dimension is scaled accordingly: 600*(1024/900).

    • If you set a higher max_dimension (e.g 2048), we fall into the first case. min_dimension will be scaled up to 1024, and max_dimension 1536.

The "Keep Aspect Ratio" resizer can be useful when the original images/regions have unusual ratios.

Note that in child view under a detection view, the "images" would actually be the parent regions. Since they are originally bounding boxes matching the objects, these regions could be highly distorted if homogenically resized.

Keep Aspect Ratio resizer
Fixed Shape resizer from Studio
Keep Aspect Ratio resizer in Studio