Deepomatic Platform
  • Overview
  • Release notes
    • January 2025
    • November 21, 2024
    • October 17, 2024
    • September 19, 2024
    • July 18, 2024
    • June 27, 2024
    • May 23, 2024
    • April 18, 2024
    • March 21, 2024
    • February 22, 2024
    • January 18, 2024
    • December 13, 2023
    • October 26, 2023
    • July 20, 2023
    • June 29, 2023
    • May 29, 2023
    • April 27, 2023
    • March 30, 2023
    • February 17, 2023
    • January 19, 2023
    • December 22, 2022
    • November 18, 2022
    • October 19, 2022
    • September 19, 2022
    • July 27, 2022
    • June 26, 2022
    • May 17, 2022
    • April 13, 2022
    • March 17, 2022
    • February 10, 2022
    • December 21, 2021
    • October 26, 2021
  • Getting started
  • ADMIN & USER MANAGEMENT
    • Invite and manage users
      • Invite group of users at once
      • SSO
        • Azure Active Directory
  • Deepomatic Engage
    • Integrate applications
      • Deepomatic vocabulary
      • Deepomatic connectors
        • Set-up
        • Camera Connector
        • Work Order Connector
      • API integration
        • Authentication
        • Errors
        • API reference
          • Work order management
          • Analysis
            • Guide field workers
            • Perform an analysis
            • Correct an analysis
          • Data retrieval
          • Endpoints' list
      • Batch processing
        • Format
        • Naming conventions
        • Processing
        • Batch status & errors
      • Data export
    • Use the mobile application
      • Configure a mobile application
      • Create & visualize work orders
      • Complete work orders
      • Offline experience
    • Manage your business operations with customisable solutions
      • Roles
      • Alerting
      • Field services
        • Reviewing work orders
        • Exploring work orders
        • Grouping work orders
        • Monitoring assets performance
      • Insights
  • Security
    • Security
    • Data Protection
Powered by GitBook
On this page

Was this helpful?

  1. Deepomatic Drive
  2. Configuring Visual Automation Applications
  3. Evaluating performances

Validation split

Was this helpful?

Before going further on the metrics used to evaluate the quality of a model, we need to introduce the notion of training and validation set.

To avoid any bias, we need to create two separate and independent sets of images. Indeed, you don't want to evaluate the performance of a model on the same set of images it has been trained on. Hence, we distinguish between training and validation sets. By default, when you do not specify any information, all the images that you add to a project are added to the training set. To create or change the validation set, you need to click on Perform a validation split on the navigation bar in the Galleries section.

If there isn't any bias in your set of images, you can do a random validation split directly from the home page of your project (see the Project Home Page section of the page for how to access the home page of your project).

When clicking on Perform a validation split, you will see the following form:

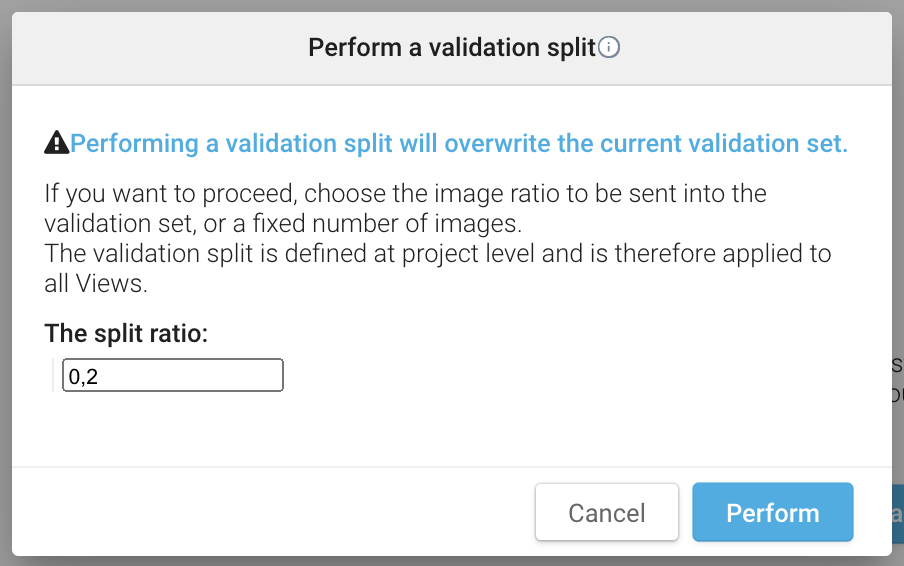
  • By entering an integer strictly greater than 1, you get a random validation split that makes sure to send the corresponding number of images in your validation set.

  • By entering a float between 0 and 1, you get a random validation split that makes sure to send the corresponding proportion of images in your validation set.

  • The same validation set applies to all your views.

After changing your validation set, it is no longer possible to compare two models.

Good to know: when you create a project from a text (JSON) file, you can directly specify to which set (training or validation) each image belongs. See the reference below:

Use Json file and via studio UI
Managing projects & views